 |
| "Nighthawks" x Edward Hopper |
My idea was to recreate the color schemes and placement of color in some of my favorite artworks using flowers. In retrospect, I think the notion I had was interesting but would take a lot more skill than I currently have. You know what they say: hindsight is 20/20.
My inital decision was to work with color schemes that I believed were easy on the eye and easy to recreate. With that to guide me, I chose two of my favorite paintings: ("The Son Of Man" by Rene Magritte and "Nighthawks" by Edward Hopper) and dove right into what I later would find was grueling and time-consuming piece-work. I was so excited to make this a success.
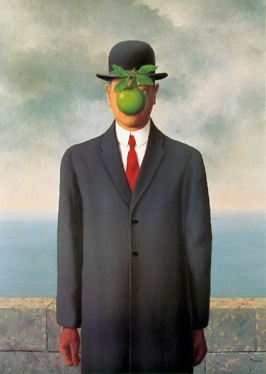 |
| "The Son of Man" x Rene Magritte. |
Well, not really.
You see, what I knew, and later came back to bite me was that the whole concept of this picture only works because of the balance of shadow. Almost every color inside the diner can also be found on the street outside of the diner; the only difference is the use of light and shadow. This implied light and lack thereof was something I couldn't recreate with the clay. If I got the color right, then the "image" that I was creating began to look muddled because you couldn't really see where the bright side of the image started and the shadowy side ended. Now if I chose to make the flowers a brighter/ darker color to compensate for the lack of light, it would look completely wrong because the colors just weren't right. Orange, for example, went from blood orange, to neon orange, to yellow-tinged orange, to every other hue you could possibly create. In the end, I decided to cut my losses with the image and just pick up every color that I possibly could with each colorful chunk and make it more of an abstract representation of Nighthawks instead of a direct representation.
I found that working on The Son of Man was a bit easier; maybe it came from experience, maybe because the colors were easier to reproduce, maybe I was delirious from hours of repetitive motion creating the flowers...I don't know, I haven't quite decided yet. For whatever reason, this one seemed to go a bit faster.
 To build the flowers, I rolled an oblong kind of "snake" out of the clay as an interior "bud" of sorts. From there, I used pinches of clay to create the petals. I'm not sure that's a real measurement, a "pinch," but that's exactly what I did: pinch the clay off the block in even sizes. They use "pinch" in cooking...a "pinch" of this, a "dash" of that, I think that I have claimed and annexed "pinch" as a measurement for the art-world. I flatted and shaped the "pinches" in between my forefinger and thumb and delicately rolled them around the snake, working in a sort of spiral outward. Once I reached the final petal, I'd use my finger or a clay tool to blend the petal edge into the rest of the flower so that it would be seamless.
I had quite a bit of trouble transporting flowers to and from class because sometimes they would smush themselves in the box I used to take them around, kind of defeating the purpose of even shaping them in the first place.
After I created all the flowers, I placed the on toothpicks. This, which seems foolproof, was a battle in and of itself. No matter how carefully you do this, there is no way to tell where the toothpick is inside of the flower and if it will come out of the other side of the bud. There are no do-overs with part, it's like performing toothpick open-heart surgery. Luckily, I only impaled a few of my flowers BUT, quite a few of my flowers were wobbling on the toothpicks because the cavity for the toothpick became too wide in trying to guide the toothpick and, were not as secure as I would have liked them to be.
.jpg) The penultimate atrocity was the most important one: baking the flowers. Just like clay in a kiln, over-baking these flowers would bring them to ruin, and indeed, it did. I now realize that baking polymer clay is like baking cookies: you take them out before they harden and allow the residual heat to finish the process. This step was not listed on the box, and therefore I had not a CLUE that this was even possible. I blindly followed the directions and came back to few cracked flowers. Also, over-baking the clay made it extremely temperamental, like china glass. A perfect flower would crack just breathing too heavily within 100 feet of it. Maybe I'm exaggerating, but not really...I did experience flowers that happened to break for no reason. It was disheartening because they took so much time to make.
The penultimate atrocity was the most important one: baking the flowers. Just like clay in a kiln, over-baking these flowers would bring them to ruin, and indeed, it did. I now realize that baking polymer clay is like baking cookies: you take them out before they harden and allow the residual heat to finish the process. This step was not listed on the box, and therefore I had not a CLUE that this was even possible. I blindly followed the directions and came back to few cracked flowers. Also, over-baking the clay made it extremely temperamental, like china glass. A perfect flower would crack just breathing too heavily within 100 feet of it. Maybe I'm exaggerating, but not really...I did experience flowers that happened to break for no reason. It was disheartening because they took so much time to make.Fitting the baked flowers into the frames was the last straw with this project. The frames (one of which I painted with intentions of a blue aged/shabby chic kind of look but ended up more like blueberry spinach vomit...) were supposed to be glued to foam and the toothpicks stuck through the foam to hold it all in place. WELL...*sigh* I guess that part kind of worked. Long story short, I should have used smooth foam or plastic foam. Lesson learned. In case you don't see where I'm going with this, I'll say NEVER try to cut into styrofoam for ANY reason...unless you enjoy swimming in packing peanuts. Styrofoam is made of tiny bits of static electrically charged demons straight from the pits of hell. Once they attach themselves to you and your home, its like having a roach infestation....they are EVERYWHERE. Look, just trust me...don't do it. At the end of the day, you'll need an exorcist, a new vacuum, and whatever you were trying to cut will still be raggedy.
.jpg)
The worst part of this final fitting was getting the flowers to stand properly. Remember when I said that I worked from corner to corner recreating the chunks of color and placing the flowers in the frame? Well yeah, that totally looks great when they're laying down, but when they're propped up on tooth picks? Whole different ball game. My images, once end to end with flowers now looked sparse as you could see the foam down in the spaces beneath the petals. Also, just like flowers growing too closely together, the petals were fighting each other for space.
Pushing the flowers to alternate their height seemed to work a little (some flowers cracked due to their delicate nature) but then I had to deal with the problem of the toothpicks sticking out of the back of the foam. Snap 'em off right? Easy enough solution. Well, not really. The toothpicks gave the flowers balance and leverage and, once again, I found this out the hard way. I started snapping toothpicks and flowers started dropping off. Nothing would keep these heavy clay flowers adhered to the foam without the help of the toothpicks keeping them upright. Also, some of the flowers that were wobbly on the toothpicks before baking were a little bit more wobbly after baking (of course there was nothing sticky keeping them together so this made sense) and were even less willing to stick to the foam. Again, I cut my losses. This whole project, at this point became a lesson in letting go.
Overall, do I feel successful? Well, not in the traditional sense. Obviously the project is atrocious to look at. However, I stuck with it and really tried to make it work...like a bad relationship. I got out of my comfort zone and worked with clay, a medium I really don't care for in the least. I think it shows, but like I said, I tried. I do think that the flowers were all quite nice at some point before the oven massacred them. It was definitely a learning experience albeit not one I'd particualrly care to relive.

No comments:
Post a Comment